


When it comes to setting up an online store, finding the right hosting provider is essential. A reliable host can ensure that your website stays up and running, even during periods of high traffic. Vercel is a hosting provider optimized for performance and scalability; it's a great choice for ecommerce storefronts.
Having a good host, however, is only half the battle; you also need a flexible ecommerce engine that can be customized to suit your needs, and this is where you need Medusa. Medusa is a composable ecommerce engine that offers many out-of-the-box features. It allows developers to choose any frontend stack and tailor the storefront as they wish.
In this tutorial, you will learn how to build a complete commerce site using Next.js, Medusa, and Stripe, and deploy the site using Vercel.
What is Vercel?
Vercel is a cloud platform that enables developers to easily build and deploy modern web projects built with frameworks like Next.js, Svelte, React.js, Nuxt.js, and more. With Vercel, you can host static sites and serverless functions. You can take advantage of the exciting features, such as automatic HTTPS, global CDN, Vercel CLI, and atomic deployments.
Vercel integrates with Git, i.e. it can connect to your Git repository and automatically deploy your code when changes are made to it. This is known as "continuous integration and deployment" (CI/CD).
Hence, you can easily deploy your projects without having to worry about managing infrastructure. Whether you're a beginner or an experienced developer, Vercel provides a seamless developer experience that allows you to focus on building great products.
Why use Vercel?
Easy Deployment and Hosting: Vercel makes it simple to deploy and host web projects with its intuitive interface and one-click setup.
Integration with Popular Frameworks and Tools: Vercel supports a many popular frameworks and tools, including React, Angular, Vue, Next.js, and more, making it a versatile option for a variety of web projects.
Automatic HTTPS and Global CDN: Vercel automatically provisions and renews SSL certificates for your domain and distributes your project's files to a global CDN, which helps to improve the performance and security of your website.
What is Next.js?
Next.js is a popular open source JavaScript framework for building server-rendered and statically-generated web applications. It is based on React, a JavaScript library for building user interfaces. It is designed to make it easy for developers to create fast, scalable web applications that are optimized for performance.
Next.js provides features and tools for building and deploying web applications, including server-side rendering, automatic code splitting, incremental static regeneration, data fetching, and support for static and dynamic routes.
It is SEO-friendly and widely used by developers to build modern web applications. It is known for its simplicity and ease of use.
Why use Next.js?
Server Rendering: Next.js is a framework for building server-rendered React applications. This means that the initial render of a Next.js application is done on the server, which can improve the performance and SEO of your website.
Automatic Code Splitting: Next.js automatically splits your code into small chunks, which helps to reduce the initial load time of your website and improve the user experience.
Hot Code Reloading: Next.js supports hot code reloading, which allows you to see changes in your code without having to manually refresh the page.
What is Medusa?
Medusa is an open source, Node.js-based, composable commerce engine. It has an amazing developer experience and endless customization options for ecommerce businesses looking to scale.
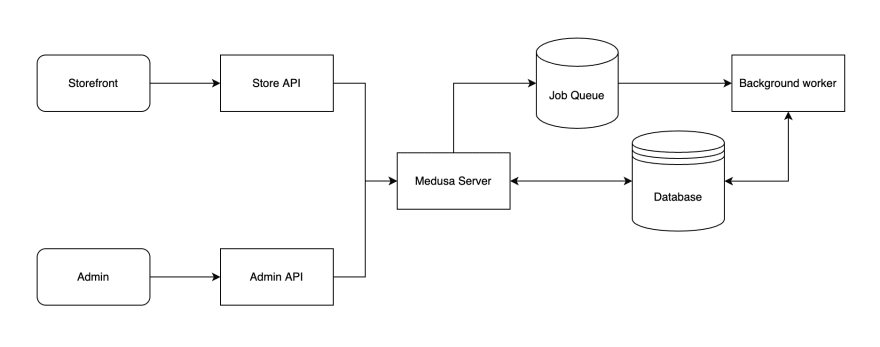
Medusa has three components: Medusa Server, Medusa Admin, and Medusa Storefront. The Medusa server can be integrated with any frontend technology of your choice, thereby making it easy for developers to use different frontend technology while building their online stores.
Medusa has essential ecommerce features such as an admin dashboard, a multi-payment option, manual orders, multi-currency support, a shopping cart, products and image optimization, an SEO-friendly interface, and more.
Why use Medusa?
Accessible Codebase: As an open source commerce engine, Medusa has all its codebase available on its official GitHub Repository, making it more accessible for developers.
Headless Architecture: Medusa is based on Node.js and separates the frontend from the backend. It also separates the admin panel from the backend. Making changes in one part, either backend, admin, or storefront doesn’t affect the other. This will help developers know where to focus when fixing a bug.
Strong Community Support: Medusa provides 24/7 community support through its Discord channel.
What is Stripe?
Stripe is a payment processing platform that provides a simple, secure way for businesses to accept payments online. It offers a range of tools and services for processing transactions, including support for credit and debit card payments and other forms of payment such as Apple Pay and Google Pay.
Stripe provides a comprehensive set of APIs and libraries that make it easy for developers to integrate its payment processing capabilities into their websites and applications.
Why use Stripe?
Secure Payments: Stripe uses industry-standard security measures to ensure that all transactions are secure and compliant with regulations.
Scalability: Stripe can handle large numbers of transactions and can easily scale to meet the needs of growing businesses.
Robust Feature Set: Stripe offers a variety of features, including subscriptions, recurring payments, and fraud detection, which can help businesses streamline their payment process.
Prerequisites
Before starting this tutorial, ensure you have the following ready:
Creating a Medusa Project
A Medusa project is composed of the server, storefront, and admin. All these will be installed using a single command line.
In your terminal, run the following command:
npx create-medusa-app
While the above command is running, you’ll be asked to enter the name of the directory you want the project to be installed. You can either leave the default value my-medusa-store or enter a new name.

Next, choose the Medusa server starter. The Medusa server is created from a starter template. By default, it is created from the medusa-starter-default template. So choose medusa-starter-default to enable you to follow up with this project.

Doing this will install the server under the directory my-medusa-store/backend. It will also create an SQLite database inside that directory with demo data seeded into it.
After choosing the Medusa starter, the next prompt will ask you to choose the storefront starter. Choose Next.js Starter which is what you will use for this project storefront.

Once you are successfully done with the above, you can follow the code block below to navigate around your store server, admin, and storefront:
## Medusa API
cd my-medusa-store/backend
medusa develop

## Medusa Store Admin
cd my-medusa-store/admin
npm start

## Medusa Storefront
cd my-medusa-store/storefront
npm run dev
Note: Each folder (backend, admin, and storefront) has its own Git history.
Install and Configure Stripe Medusa Plugin in Medusa Backend
The Stripe Medusa plugin will enable Stripe payment to work on this project and also create a channel for your project to communicate with Stripe APIs.
Before you start, navigate to your backend directory using the following command:
cd my-medusa-store/backend
In the root of your backend, run the following command to install the Stripe plugin:
npm install medusa-payment-stripe
Next, you need to add STRIPE API KEY and STRIPE WEBHOOK SECRET to your .env file:
STRIPE_API_KEY=example_API_key_xxxxx
STRIPE_WEBHOOK_SECRET=example_WEBHOOK_key_xxxxx
In the above, replace example_API_key_xxxxx and example_WEBHOOK_key_xxxxx with the keys gotten from your Stripe dashboard.
Note: Stripe webhook secret is not necessary to add in development. You can skip it if you wish.
Next, you need to add configurations for your Stripe plugin. In medusa-config.js, add the following at the end of the plugins array:
const plugins = [
  // ...
  {
    resolve: `medusa-payment-stripe`,
    options: {
      api_key: process.env.STRIPE_API_KEY,
      webhook_secret: process.env.STRIPE_WEBHOOK_SECRET,
    },
  },
]
Test Medusa Server
If you’ve completed the above processes, start your store server with the command below:
medusa develop
You can navigate to localhost:9000/store/products/ to see available products in your store.

The image you see above represents a sample response containing your store products. You should see something similar.
Enable Stripe Payment Provider in a Region
Regions in Medusa are used to manage the markets where you will operate within. You can manage and add multiple countries in a region. You can also manage shipping options and payment providers.
Before you start, navigate to your admin directory and start your admin using the following command:
cd my-medusa-store/admin
npm start
Ensure your backend server is still running, then localhost:7000 on your browser to access your admin page.
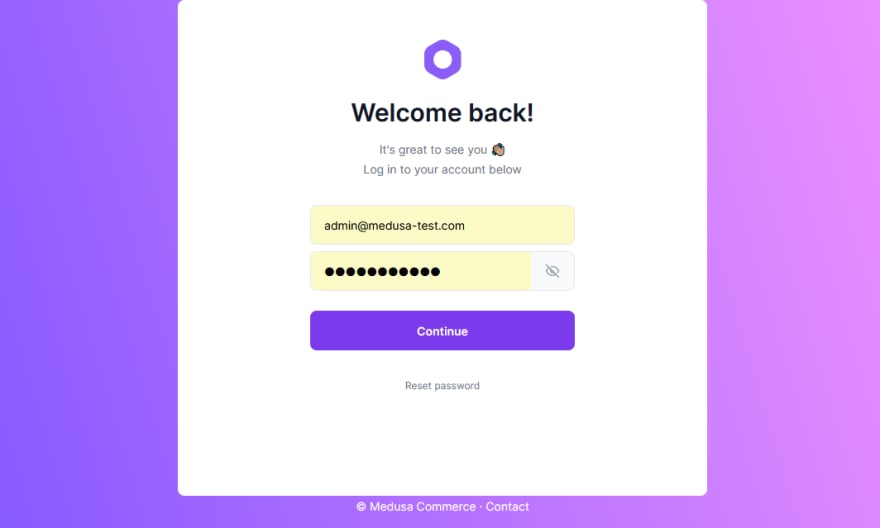
If you completed the steps above successfully, then you should a page similar to the image above.
Medusa seeded your database with a demo admin that you can log in with. The email is admin@medusa-test.com, and the password is supersecret.
If you log in with the demo admin login details, you will have access to your admin dashboard.
The next step is to add Stripe Payment to your Regions, simply follow the steps below:
Go to Settings → Regions.
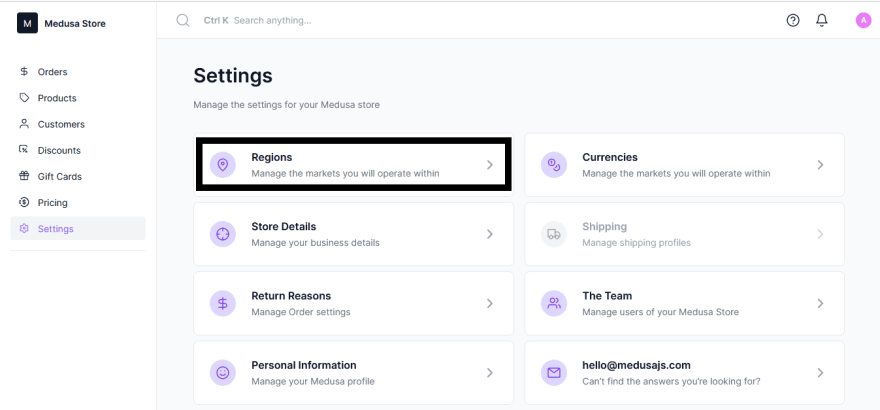
Click on the region you want to edit from the Regions section.

Click on the three-dot icon at the top right of the selected region and click on Edit Region Details.

Select Stripe as the payment provider.

Once done with step 4, you can click on the Save and close button to save.
Repeat these steps to add Stripe Payment to other regions.
Test Next.js Storefront
Before testing, switch to the storefront directory and rename the template environment variable file to use environment variables in development:
cd my-medusa-store/storefront
mv .env.template .env.local
Then, add Stripe public key to your Next.js storefront.
In your .env.local file (or the file you’re using for your environment variables), add the following variable:
NEXT_PUBLIC_STRIPE_KEY=<YOUR_PUBLISHABLE_KEY>
Make sure to replace <YOUR_PUBLISHABLE_KEY> with your Stripe Publishable Key.
Lastly, ensure your Medusa server is running, then run the command below:
npm run dev
After a few seconds of running the above command, navigate to localhost:8000 on your browser to see your Next.js ecommerce storefront homepage.
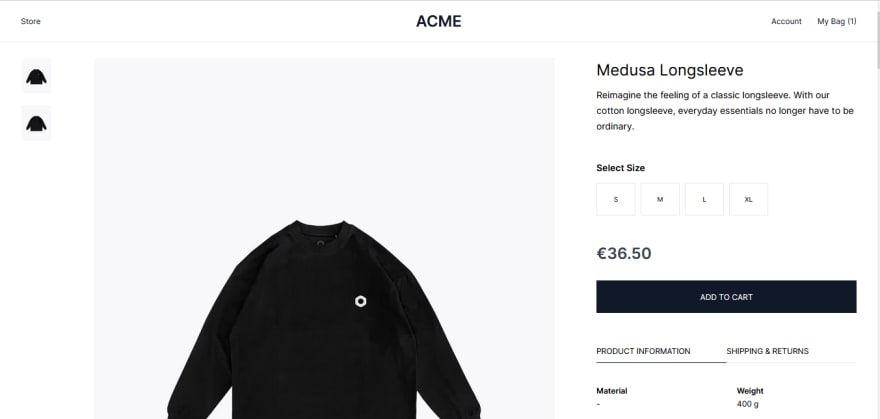
Scroll down to select a product from the featured products on the homepage.

Click on a product to view the single product **page where you can add items to your cart.
If you click on My Bag at the top right of your store, you will view the cart review page of your store.
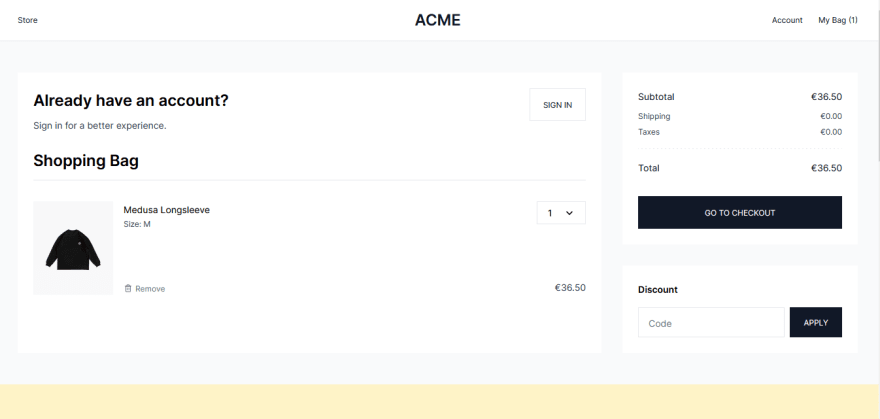
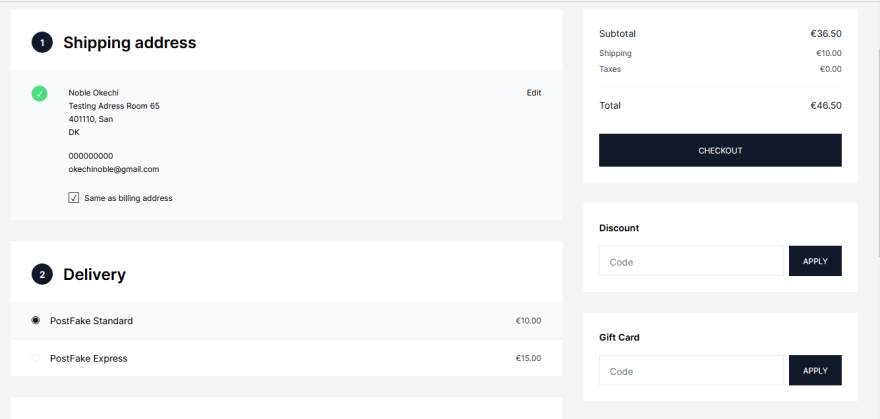
Click on GO TO CHECKOUT to see your Checkout page, where you will be asked to input your delivery information.
After a successful payment, you’ll see the Order Receipt Page.

Deployment to Vercel
After testing your store, the next thing is to deploy your store backend, admin, and storefront using Vercel.
Deploying Medusa Backend
Medusa has already provided different clear documentation on how to host Medusa Server in different hosting servers.
You check Medusa Server Deployment Guide to deploy your backend to any server of your choice.
Deploying Medusa Admin Panel
You can easily deploy your Medusa Admin on Netlify by following Medusa Admin Deployment Guide.
Deploying Next.js Storefront
In deploying your Next.js Storefront, you will handle this using Vercel.
Deploying Next.js storefront in Vercel can be done using Vercel CLI or Vercel for Git. For this tutorial, you can deploy using Vercel for Git, using the steps below as a guide.
Note: You should have the backend URL ready because it will be needed.
Push your storefront project to a GitHub repository.
On your Vercel dashboard, click on the import button to import a new project.

Enter the name of your project in the Project Name field.

Add the environment variables: NEXT_PUBLIC_MEDUSA_BACKEND_URL and NEXT_PUBLIC_STRIPE_KEY.

When configuring your environment variable, ensure you set the backend URL with your production server (for example: https://my-medusa-server.com) and your live Stripe public key.
Click on deploy to start the deployment process.

Once the deployment process is completed, your storefront is ready. You can visit the domain link to view your storefront.
Note: Before testing, ensure you update your server’s
STORE_CORSenvironment variable with the new Vercel URL to avoid CORS issues. You can check CORS configurations on Medusa documentation.
Conclusion
In this tutorial, you learned how to build a Vercel ecommerce site using Next.js, Medusa, and Stripe. You’ve gone through the steps of setting up Medusa Server, Medusa Admin, and Medusa Next.js Storefront.
You can also add various features to your store, like Algolia search engine service, Mailchimp email marketing service for newsletters, Segment data platform for collecting analytics, and many more.
You can learn more about Medusa commerce engine from Medusa’s Documentation.
Should you have any issues or questions related to Medusa, then feel free to reach out to the Medusa team via Discord.